
 Français
 العربية
This post list steps to prepare a continuous integration platform using Jenkins on an Ubuntu Linux server. You’ll find at the end a shell script that can be used to do all steps one shot.
All commands should be lunched under root privileges .
Update system and packages
apt-get update && apt-get upgrade
Install Apache
apt-get install apache2
You may got this warning : AH00558: apache2: Could not reliably determine the server’s fully qualified domain name, using 46.226.104.61. Set the ‘ServerName’ directive globally to suppress this message. You can ignore this warning if you will configure your website later.
In this case you should edit the main configuration file and set :
vi /etc/apache2/apache2.conf

ServerName myserver.domain.local

service apache2 restart
The warning message should disappear.
Install PHP /Perl /Python
This languages help us to add several web tools such us phpMyAdmin and complete packages to get a full LAMP server.
apt-get install php5 php5-mysql libapache2-mod-php5
apt-get install perl libapache2-mod-perl2
apt-get install python libapache2-mod-python
Test installation
The default website document root should be /var/www/html. You can add a test.php file with this line to check php installation
echo "<!--?php phpinfo(); ?-->">/var/www/html/test.php
Install MySql
apt-get install mysql-server mysql-client
Installtion of phpMyAdmin
apt-get install phpmyadmin
You to follow instruction for configuration in Apache and it’s config database.
Install JDK7
Because of licence terms imposed by Oracle, the package is not out of the box in linux. Open JDK is the default package integrated in Ubuntu. Some java application are not fully compatible with this edition that’s why I recommand to remove it and install the offical Java Edition. Here is steps to install Oracle JDK 7 using apt-get.
Add WebUpd8 Oracle Java PPA repository
You should use add-apt-repository command to add the repository to source list. if this command is not available you shoud install python-software-properties and ubuntu 14.04 software-properties-common.
Install Oracle Java 7 in Ubuntu Or Linux Mint Via PPA Repository
apt-get install software-properties-common
Then y can use this command to add Java repository
add-apt-repository ppa:webupd8team/java
You can try to add the source manually (not tested on Ubuntu)
echo "deb http://ppa.launchpad.net/webupd8team/java/ubuntu precise main" | tee /etc/apt/sources.list.d/webupd8team-java.list
echo "deb-src http://ppa.launchpad.net/webupd8team/java/ubuntu precise main" | tee -a /etc/apt/sources.list.d/webupd8team-java.list
apt-key adv --keyserver hkp://keyserver.ubuntu.com:80 --recv-keys EEA14886
Install Oracle JDK 7
apt-get update
apt-get install oracle-java7-installer
java -version
The installation precessus will ask you to accept Oracle Java Licence to continue.
Intallation of Jenkins
This link details jenkins standalone installation on an Ubuntu Server. But here is a summary
Add Jenkins Repository
wget -q -O - https://jenkins-ci.org/debian/jenkins-ci.org.key | apt-key add -
sh -c 'echo deb http://pkg.jenkins-ci.org/debian binary/ > /etc/apt/sources.list.d/jenkins.list'
Install jenkins package
apt-get update
apt-get install jenkins
Configure Jenkins
If service fail to start because of default port is used with another application, you can change it in /etc/default/jenkins. For example
HTTP_PORT=8080
by
HTTP_PORT=8081
You may need to change default Java parameter specially to specify Maximum Heap Size. You can change it also in /etc/default/jenkins
JAVA_ARGS="-Djava.awt.headless=true" # Allow graphs etc. to work even when an X server is present
#JAVA_ARGS="-Xmx256m"
#JAVA_ARGS="-Djava.net.preferIPv4Stack=true" # make jenkins listen on IPv4 address
Set up Apache as proxy for 80 to jenkins port (8080)
install apache mod_proxy and mod_proxy_http
a2enmod proxy
a2enmod proxy_http
service apache2 restart
Configure jenkins apache website
Create a file called jenkins.conf in /etc/apache2/sites-available
ServerAdmin webmaster@localhost
ServerName ci.company.com
ServerAlias ci
ProxyRequests Off
Order deny,allow
Allow from all
ProxyPreserveHost on
ProxyPass / http://localhost:8080/ nocanon
AllowEncodedSlashes NoDecode
Install jenkins apache site
a2ensite jenkins
service apache2 reload
Setting security policy
Connect to you jenkins platform. A warning about security acces will be displayed. You should correct it towork.
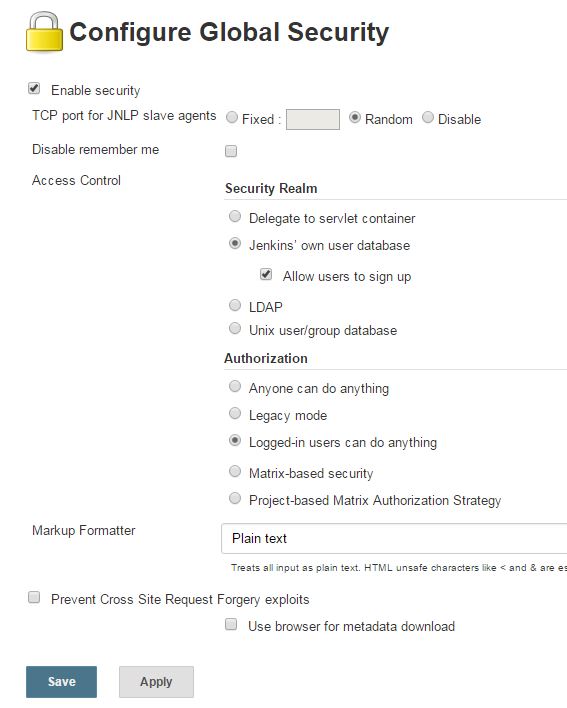
After saving this setting you should create admin account.
Install Sonar
You can found detailed instruction in this post
Create database
root@XXXXXX:~# mysql -u root -p
Enter password:
Welcome to the MySQL monitor. Commands end with ; or \g.
Your MySQL connection id is 71
Server version: 5.5.46-0ubuntu0.14.04.2 (Ubuntu)

Copyright (c) 2000, 2015, Oracle and/or its affiliates. All rights reserved.

Oracle is a registered trademark of Oracle Corporation and/or its
affiliates. Other names may be trademarks of their respective
owners.

Type 'help;' or '\h' for help. Type '\c' to clear the current input statement.
CREATE DATABASE sonar CHARACTER SET utf8 COLLATE utf8_general_ci;

CREATE USER 'sonar' IDENTIFIED BY 'xxxxxxxxxx';

GRANT ALL ON sonar.* TO 'sonar'@'localhost' IDENTIFIED BY 'sonar';

FLUSH PRIVILEGES;
Install Sonar server
Download packages
The latest version at this date is 5.2. You can connect to sonar web site and check latest version
wget https://sonarsource.bintray.com/Distribution/sonarqube/sonarqube-5.2.zip
unzip sonarqube-5.2.zip
mv sonarqube-5.2 /opt/sonar
Configure Server
Edit /opt/sonar/conf/sonar.properties to set database connexion infos and change port if default port are in conflit with other application (9000 and 9001)
sonar.jdbc.username=sonar
sonar.jdbc.password=xxxxx
sonar.jdbc.url=jdbc:mysql://localhost:3306/sonar?useUnicode=true&characterEncoding=utf8&rewriteBatchedStatements=true&useConfigs=maxPerformance
sonar.web.port=8090
sonar.search.port=8091
Configure SonarQube server as a service [optional]
Create a copy of launhing script to init.d folder
# cp /opt/sonar/bin/linux-x86-64/sonar.sh /etc/init.d/sonar
Edit the starting script and add/replace this lines :
# vi /etc/init.d/sonar
SONAR_HOME=/opt/sonar
PLATFORM=linux-x86-64
...
WRAPPER_CMD="${SONAR_HOME}/bin/${PLATFORM}/wrapper"
WRAPPER_CONF="${SONAR_HOME}/conf/wrapper.conf"
...
PIDDIR="/var/run"
Register Sonar as Service
update-rc.d -f sonar remove
chmod 755 /etc/init.d/sonar
update-rc.d sonar defaults
/etc/init.d/sonar start
Configure sonar apache website
Create a file called sonar.conf in /etc/apache2/sites-available
#vi /etc/apache2/sites-available/sonar.conf

ServerAdmin webmaster@localhost
ServerName sonar.company.com
ServerAlias sonar
ProxyRequests Off
Order deny,allow
Allow from all
ProxyPreserveHost on
ProxyPass / http://localhost:8090/ nocanon
AllowEncodedSlashes NoDecode
Install sonar apache site
a2ensite sonar
service apache2 reload
Install Sonar Runner
wget http://repo1.maven.org/maven2/org/codehaus/sonar/runner/sonar-runner-dist/2.4/sonar-runner-dist-2.4.zip
unzip sonar-runner-dist-2.4.zip
mv sonar-runner-2.4 /opt/
Edit /opt/sonar-runner-2.4/conf/sonar-runner.properties to set database connexion infos
sonar.host.url=http://localhost:8090
sonar.jdbc.url=jdbc:mysql://localhost:3306/sonar?useUnicode=true&characterEncoding=utf8
sonar.jdbc.username=sonar
sonar.jdbc.password=sonar
Conclusion
We have now a new Ubuntu Continous Intgration Server. We have to configure each module with your appropriate projets.
Just wan to say your article is as astounding. The clarity to your publish is simply spectacular annd
that i could suppose you’re knowledgeable in tthis subject.
Fine with your permission let me to clutch your RSS feed to keep up to date wjth iimpending post.
Thank you a mllion and please carry on the enjoyable work.