After hours on google and my Ubuntu working VMs, I found a solutions to establish the VPN tunnel to my office datacenter. Something that should very easy and simple to do with other devices and OSs (Android, iOS, Windows 10) it is very hard with Ubuntu (Very strange Non ?) !! As Jason’s blog report « Unfortunately as many people likely know (after a few google searches it seems) the client for this is pretty crap in Ubuntu 16.04. » And I confirm.
Here is a small howto configure your VPN to a Fortigate 90D (FortiOs 5.2) with Ubuntu 15.10 Wily Werewolf or Ubuntu 16.04 LTS Xenial Xerus.
To check your Ubuntu version :
lsb_release -a
Configure On-demand tunnel using native L2TP/IPSec on your FortiGate
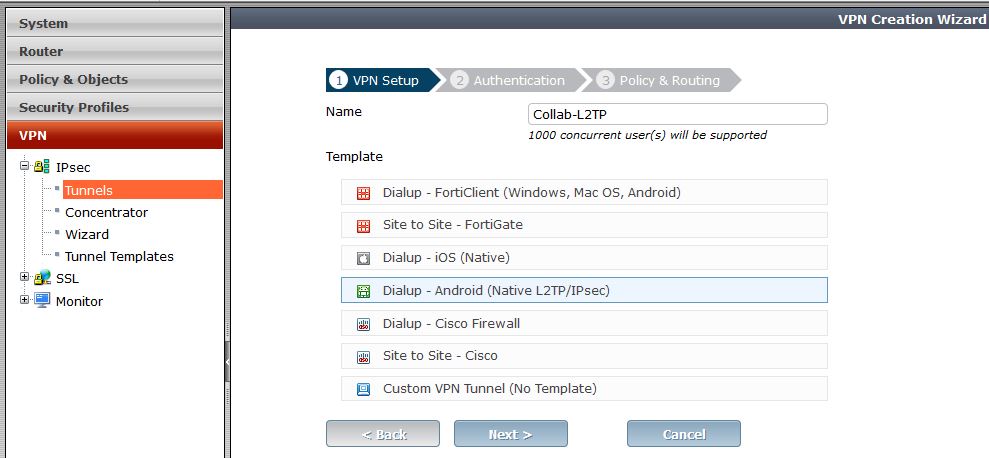
The latest Fortigate firewall/routers comes with some templates for creating VPN Tunnels. We should use » Dialup – Android (Native L2TP/IPsec) » to get Ubuntu users connected.
I tried the « Dialup – Cisco Firewall » that should work with vpnc packages but nothing works fine !!.
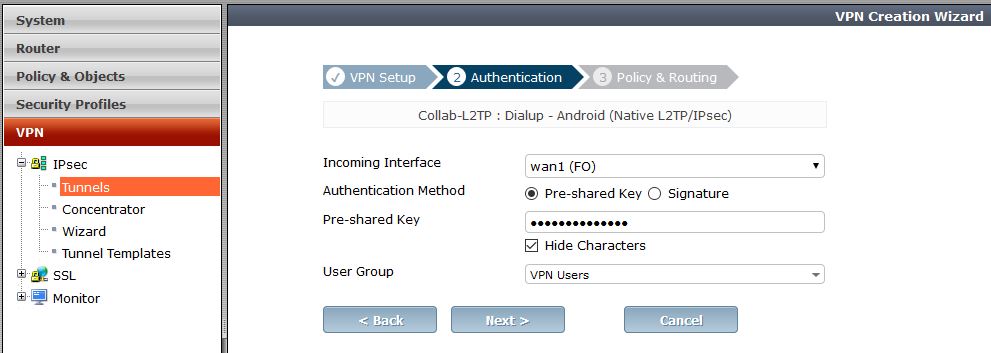
Here is a sample wizard to create your VPN tunnel :
- Create a User group « VPN Users » for users that they should establish the VPN connection.

- Create local user or synchronize them from your remote active directory and attach them to « VPN Users ». For manually configuration (First solution) you should not use special characters ($ & ..) in the password.
- Create the tunnel template as presented in secreen shots
- Step 1 : VPN Setup
- Step 2 : Authentication
- Step 3 : Policy & Routing

- Step 1 : VPN Setup
- Note the tunnel template detail by clicking on the template name from the tunnel lis :
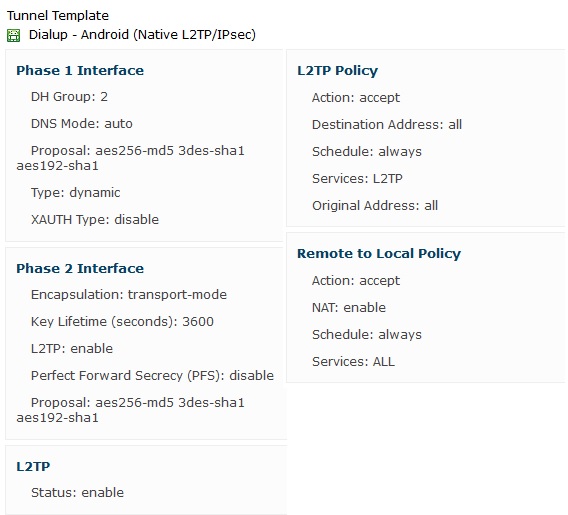
- You should also note :
- Public IP address
- Preshared key
- Username and Password
Solution 1 : Manual configuration using strongswan xl2tpd packages
I followed Jason’s ticket : http://www.jasonernst.com/2016/06/21/l2tp-ipsec-vpn-on-ubuntu-16-04/. This solution works fine on Ubuntu 15.10 and 16.04
- Install required packages
sudo apt-get install -y strongswan xl2tpd
- Create / Edit the ipsec.conf file
sudo vi /etc/ipsec.conf
# ipsec.conf - strongSwan IPsec configuration file
# basic configuration
config setup
#     strictcrlpolicy=yes
#     uniqueids = no
# Add connections here.
# Sample VPN connections
conn %default
     ikelifetime=60m
     keylife=20m
     rekeymargin=3m
     keyingtries=1
     keyexchange=ikev1
     authby=secret
     ike=aes256-md5-modp1024,3des-sha1-modp1024!
# esp=aes256-md5-modp1024,3des-sha1-modp1024!
conn XXX-YOUR-CONNECTION-NAME-XXX
     keyexchange=ikev1
     left=%defaultroute
     auto=add
     authby=secret
     type=transport
     leftprotoport=17/1701
     rightprotoport=17/1701
# set this to the ip address of your vpn server
     right=FIREWALL_PUBLIC_IP
Note my modifications in bold to be able to negociate DH phase 1 & 2 algorithm and hash with our Fortigate VPN tunnel specifications.
- Put the preshared key in ipsec.secrets
sudo nano /etc/ipsec.secrets
: PSK "YOUR_PSK_GOES_HERE"
- Setup the xl2tpd.conf
sudo vi /etc/xl2tpd/xl2tpd.conf
[lac XXX-YOUR-CONNECTION-NAME-XXX]
lns = FIREWALL_PUBLIC_IP
ppp debug = yes
pppoptfile = /etc/ppp/options.l2tpd.client
length bit = yes
- Setup the ppp configuration
sudo vi /etc/ppp/options.l2tpd.client
ipcp-accept-local
ipcp-accept-remote
refuse-eap
require-mschap-v2
noccp
noauth
idle 1800
mtu 1410
mru 1410
defaultroute
usepeerdns
debug
lock
connect-delay 5000
- Create run file and path for xl2tp
sudo mkdir -p /var/run/xl2tpd
sudo touch /var/run/xl2tpd/l2tp-control
- Restart Services
sudo service strongswan restart
sudo service xl2tpd restart
- Bring up the l2tp tunnel interface
sudo ipsec up XXX-YOUR-CONNECTION-NAME-XXX
you should have something like this on output.
initiating Main Mode IKE_SA XXX-YOUR-CONNECTION-NAME-XXX[1] to FIREWALL_PUBLIC_IP
generating ID_PROT request 0 [ SA V V V V ]
sending packet: from 192.168.1.64[500] to FIREWALL_PUBLIC_IP[500] (188 bytes)
received packet: from FIREWALL_PUBLIC_IP[500] to 192.168.1.64[500] (144 bytes)
parsed ID_PROT response 0 [ SA V V V ]
received NAT-T (RFC 3947) vendor ID
received DPD vendor ID
received unknown vendor ID: 82:99:03:17:57:a3:60:82:c6:a6:21:de:00:05:02:e0
generating ID_PROT request 0 [ KE No NAT-D NAT-D ]
sending packet: from 192.168.1.64[500] to FIREWALL_PUBLIC_IP[500] (236 bytes)
received packet: from FIREWALL_PUBLIC_IP[500] to 192.168.1.64[500] (220 bytes)
parsed ID_PROT response 0 [ KE No NAT-D NAT-D ]
local host is behind NAT, sending keep alives
generating ID_PROT request 0 [ ID HASH ]
sending packet: from 192.168.1.64[4500] to FIREWALL_PUBLIC_IP[4500] (76 bytes)
received packet: from FIREWALL_PUBLIC_IP[4500] to 192.168.1.64[4500] (76 bytes)
parsed ID_PROT response 0 [ ID HASH ]
IKE_SA XXX-YOUR-CONNECTION-NAME-XXX[1] established between 192.168.1.64[192.168.1.64]...FIREWALL_PUBLIC_IP[FIREWALL_PUBLIC_IP]
scheduling reauthentication in 3247s
maximum IKE_SA lifetime 3427s
generating QUICK_MODE request 111451902 [ HASH SA No ID ID NAT-OA NAT-OA ]
sending packet: from 192.168.1.64[4500] to FIREWALL_PUBLIC_IP[4500] (252 bytes)
received packet: from FIREWALL_PUBLIC_IP[4500] to 192.168.1.64[4500] (172 bytes)
parsed QUICK_MODE response 111451902 [ HASH SA No ID ID NAT-OA NAT-OA ]
connection 'XXX-YOUR-CONNECTION-NAME-XXX' established successfully
- Authenticate using your username & password
sudo bash -c "echo \"c XXX-YOUR-CONNECTION-NAME-XXX username password\" > /var/run/xl2tpd/l2tp-control"
- Now you should have a ppp interface up
ifconfig
ppp0 Link encap:Point-to-Point Protocol
inet addr:192.168.202.2 P-t-P:192.168.202.1 Mask:255.255.255.255
UP POINTOPOINT RUNNING NOARP MULTICAST MTU:1410 Metric:1
RX packets:7 errors:0 dropped:0 overruns:0 frame:0
TX packets:6 errors:0 dropped:0 overruns:0 carrier:0
collisions:0 txqueuelen:3
RX bytes:283 (283.0 B) TX bytes:256 (256.0 B)
- At this moment you should contact any server in your office datacenter. however if you want that all your internet traffic pass in the vpn tunnel you should add this routes :
- note the local gateway :
route
Kernel IP routing table
Destination Gateway Genmask Flags Metric Ref Use Iface
default 192.168.1.254 0.0.0.0 UG 0 0 0 eth0
link-local * 255.255.0.0 U 1000 0 0 eth0
172.17.0.0 * 255.255.0.0 U 0 0 0 docker0
172.26.0.0 * 255.255.0.0 U 100 0 0 eth2
192.168.1.0 * 255.255.255.0 U 0 0 0 eth0
192.168.200.0 * 255.255.255.0 U 0 0 0 ppp0
192.168.202.1 * 255.255.255.255 UH 0 0 0 ppp0
=> your local default gateway is 192.168.1.254
=> your vpn local gateway ip is 192.168.202.1 - Add route to the FIREWALL_PUBLIC_IP
sudo route add FIREWALL_PUBLIC_IP gw LOCAL_DEFAULT_GATEWAY
- Add default route
sudo route add -net default gw VPN_GATEGOAY
- You can check your outgoing ip with http://www.mon-ip.com you should got your office ip address or
$ curl http://ipinfo.io
{
  "ip": "AA.BB.CC.DD",
  "city": "Amsterdam",
  "region": "North Holland",
  "country": "NL",
  "loc": "52.3556,4.9135",
  "postal": "1091",
  "org": "AS8075 Microsoft Corporation"
}
- note the local gateway :
- To release the tunnel you should
- Shutdhown the tunnel
sudo ipsec down FIREWALL_PUBLIC_IP
- Restart services again
sudo service strongswan restart
sudo service xl2tpd restart
- Shutdhown the tunnel
Issues
- l2tp does not work with 4.15 mainline kernels
- On Raspbian tunnel can’t be necogiated:
parsed INFORMATIONAL_V1 request 1244824380 [ HASH N(NO_PROP) ] received NO_PROPOSAL_CHOSEN error notify
Solution 2 : GUI Network Manager
As reported http://blog.z-proj.com/enabling-l2tp-over-ipsec-on-ubuntu-16-04/ Ubuntu has stopped shipping L2TP on IPSec since Precise (12.04.x LTS). Here is the work around but it works only on Ubuntu 16.04.
- Install Prerequist packages :
sudo apt install \
intltool \
libtool \
network-manager-dev \
libnm-util-dev \
libnm-glib-dev \
libnm-glib-vpn-dev \
libnm-gtk-dev \
libnm-dev \
libnma-dev \
ppp-dev \
libdbus-glib-1-dev \
libsecret-1-dev \
libgtk-3-dev \
libglib2.0-dev \
xl2tpd \
strongswan
- Build the network-manager-l2tp for its git repository
git clone https://github.com/nm-l2tp/network-manager-l2tp.git
cd network-manager-l2tp
autoreconf -fi
intltoolize
- Pray to not have any errors
- Configure the build : Change path that not correspond to your installation
./configure \
--disable-static --prefix=/usr \
--sysconfdir=/etc --libdir=/usr/lib/x86_64-linux-gnu \
--libexecdir=/usr/lib/NetworkManager \
--localstatedir=/var \
--with-pppd-plugin-dir=/usr/lib/pppd/2.4.7
- Install the package :
make
sudo make install
- Remove AppArmor setting for IPSec
sudo apparmor_parser -R /etc/apparmor.d/usr.lib.ipsec.charon
sudo apparmor_parser -R /etc/apparmor.d/usr.lib.ipsec.stroke
- Replace xl2tpd with libcap
sudo apt remove xl2tpd
sudo apt install libpcap0.8-dev
wget https://github.com/xelerance/xl2tpd/archive/v1.3.6/xl2tpd-1.3.6.tar.gz
tar xvzf xl2tpd-1.3.6.tar.gz
cd xl2tpd-1.3.6
make
sudo make install
- Restart you machine
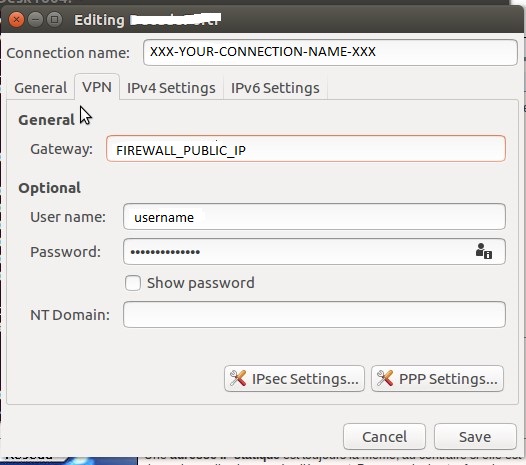
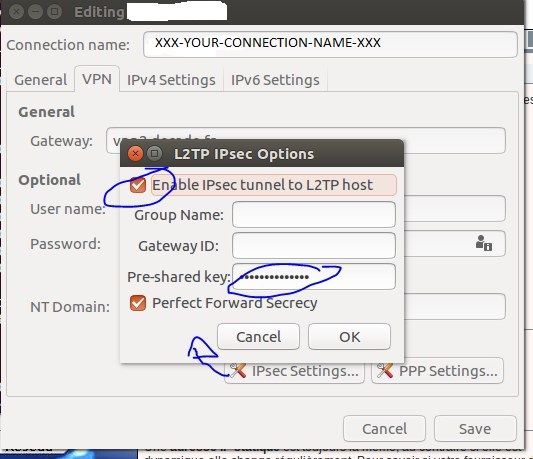
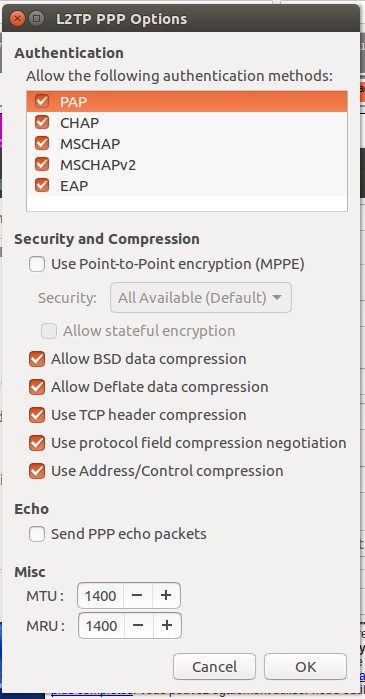
- You can now start configure your VPN Tunnel with the nm-connection-editor application. You should have a new option for vpn
Good home working 😉
Helpful links
http://www.jasonernst.com/2016/06/21/l2tp-ipsec-vpn-on-ubuntu-16-04/
http://blog.z-proj.com/enabling-l2tp-over-ipsec-on-ubuntu-16-04/
http://packages.ubuntu.com/search?keywords=libnma-dev
http://askubuntu.com/questions/617785/how-to-connect-to-l2tp-over-ipsec-vpn
https://github.com/nm-l2tp/network-manager-l2tp
https://fr.ikoula.wiki/fr/Mettre_en_place_un_VPN_L2TP/IPSEC
https://supportforums.cisco.com/document/12276506/diffie-hellman-groups
https://doc.pfsense.org/index.php/IPsec_Troubleshooting
http://cookbook.fortinet.com/ipsec-vpn-troubleshooting/
https://gist.github.com/psanford/42c550a1a6ad3cb70b13e4aaa94ddb1c
http://stackoverflow.com/questions/82256/how-do-i-use-sudo-to-redirect-output-to-a-location-i-dont-have-permission-to-wr

 English
 العربية
Hi, I need a L2TP/IPSec VPN software which can be installed in ubuntu 16.10.
Do you think strongswan xl2tpd packages is compatible for this version of ubuntu 16.10?
if yes then Is it free ware software?
If no, can you suggest me any other VPN software options??
Thanks
Munim Morshed
Thank you for your comment and question. As you see, those packages à available for ubuntu repository so they are free. I’ve also tried some GUI packages but I got some issues.
If you find something else please keep me in touch.
Best regards
Thank you man, very helpful!
Your solution 1 works fine on Kubuntu 16.10.
In my case, I should also add:
leftnexthop=%defaultroute
rightnexthop=%defaultroute
rightid=%any
to ipsec.conf to custom connection properties. (I don’t exactly know what that properties mean)
Additional implicit notes:
1. Keep indents in ipsec.conf
2. Use « journalctl -xe » to watch any network errors you can encounter.
Thank you Evgeny
Hi
How can i enable DHCP over IPsec on advanced VPN configuration on Linux client app? Our forti100d configured to issue IP’s over dhcp so without enabling this from client app clients want get connect. is it possible with Linux client to enable this option.